Sunday, December 30, 2012

Puteri Ayu - Pandan Sponge Cake with Shredded Coconut


Nonya kueh is one of my flavour dessert, just give me any type of nonya kueh and I just simply love it. Most of the nonya kueh have a important key ingredients it can't neglect out, that is..... Coconut. Coconut milk or shredded coconut is the most critical parts for kueh making or pairing. And my top love are shredded coconut cook with red sugar and coconut milk with yam. Yum!


I bought this mould at only $1 for 14 mould. This mould is simply cheap and good. The kueh can be remove off easily from the mould but of course I did apply a layer of oil on the mould before I places the shredded coconut and batter inside.


I replace the coconut milk with fresh milk as I didn't have coconut milk on hand and I wanted something healthy too. By the way I think is better stick to coconut milk because the sponge cake is not so fragrant but it taste spongy and the shredded coconut is too salty. I would recommend to reduce the salt and maybe just a pinch of salt will do instead of  ¼ tsp salt as stated. Enjoy the last Sunday of the year folks.

*Recipe source: http://nasilemaklover.blogspot.sg/2012/06/puteri-ayu-steamed-mini-pandan-sponge.html?utm_source=BP_recent

(A) Batter Ingredients:
  • 2 eggs
  • 100g caster sugar
  • 150g plain flour
  • 1/2 tsp baking powder
  • 1 tsp ovalette / cake emulsier
  • 120ml coconut milk (blend 4 pcs pandan leaves with coconut milk)
  • 1/2tsp salt
  • A drop of pandan green food colouring (optional)
(B) Topping Ingredients:
  • 60g fresh shredded coconut
  • 1/4tsp salt (Reduce if you don't want too salty taste)
  • 1 tsp corn flour
Method:
1. Mix the (B) ingredients together and keep aside.
2. Brush the mold with some cooking oil, fill bottom of the mold with shredded coconut.
3. Stack 2 mold together and press till shredded coconut is firmed.
4. Sift flour and baking powder.
5. Beat sugar, eggs and ovalette until fluffy.
6. Add coconut milk and mix well.
7. Slowly add in flour and mix till well combine, add in colouring.
8. Fill the sponge cake mold with batter till full.
9. Prepare steamer, when water boil put in the mini sponge cake, steam for 10 -15mins.
10. When cake turned slightly cool, remove the cake from the mold.

Thursday, December 27, 2012

Plain White Roll - 香草微波面包


I'm a bread lover but not a bread maker. My last few attempt keep me distance away from making bread because kneading the dough really make me weary. But in future I will make more bread, thanks to my hand mixer dough hook.

Life really can't live without some electronic stuff. Using the hand mixer to knead the dough is really an ideal idea. It help to save my time and most importantly it help to lighten my hand from aching. It only take me about 15 to 20 min to knead the dough with the hand mixer and if I using my hand to knead, it take me about 45 to 60 min. (-_-")


Opps, the shape of the bread is quite out of standard and not unit. It's alright as long as the bread taste good. And it really taste great, this is the kind of bread I wish I would able to make it and I did it. =D
Thanks to those awesome blogger who share the recipe.

Anyway I realise that there are 3 different method of making bread. The 3 different method are 直接發酵法 (straight dough method), 中種發酵法 (sponge dough method) and 湯種法。I have no idea what is the english name for 湯種法. You may google for more information about the 3 method that I have listed. 


For this bread, is using the 中種發酵法 (sponge dough method) and it yield a soft and fluffy bread. My last few attempt is using 直接發酵法 (straight dough method), which give me a hard and tough texture. I still left with 湯種法 which I haven't try before, soon soon I will give it a try. ;)

Weee!! I'm really thrilled the moment when I saw the soft layer and layer from the side when I pull one of the bun from the whole roll. This is the result I dream of and the bread taste so soft. Yummy and the bread still stay soft the next day. 

*Recipe source: http://siewhwei80.blogspot.com.au/2012/12/blog-post_22.html
*I halve the recipe portion and using 孟老师 method.

中種發酵法 - (Sponge dough method)

(A) Sponge dough Ingredients:
  • 201gm bread flour
  • 4gm yeast
  • 16gm milk powder
  • 50gm egg (one egg)
  • 73ml fresh milk
(B) Main dough ingredients:
  • 67gm bread flour
  • 40gm brown sugar
  • 4gm salt
  • 27ml fresh milk
  • 1 tsp vanilla extract
  • 30gm butter
Method:
  1. Mix all ingredients (A) together and form into a dough (do not need to knead). Cover with a cling wrap or damp cloth and leave to proof for 90 min.
  2. After 90 min, mix all the ingredients (A) and (B) except the butter together and knead the dough until it is not so sticky. Put the piece of butter into the dough and continue to knead until the dough is smooth, look shiny and can stretch into a thin sheet without breaking into hole.
  3. Cover the dough with a cling wrap or damp cloth and leave to proof for another 50 min.
  4. After 50 min, divide the dough into each 40gm. Shape it into balls and cover the dough with a cling wrap or damp cloth, leave to rest for 10 min.
  5. After 10 min, roll out dough into long rectangle shape and roll it back like swiss roll shape.
  6. Place the individual dough into baking tray.
  7. Cover the dough with a cling wrap or damp cloth and leave to proof for 30 min.
  8. Preheat oven at 170°C. Brush milk or egg wash on the bread surface and bake for 12-15 mins or till golden brown.

Tuesday, December 25, 2012

Black Sasame Marble Cake


This is my first attempt on black sesame marble cake. The actual recipe is chocolate marble cake but I want to try something different. I use the same black sesame paste for the flavour instead of powder, can be found in my previous post here.


Disappointed on the marble effect, despite that this is my third attempt on making marble cake yet I still can't get the beautiful swirl pattern that I wanted. I guess the problem either the dark batter portion is too much nor I over swirl the batter when they will combine in the tin.


The cake is wonderfully moist, and it brings out the black sesame aromatic fragrant. But a mistake that I didn't realise that the top part is undercooked. I start eating from the bottom part of the cake and find it pretty awesome than slowly to the top parts texture taste quite wet and soggy. I did check if the cake is cook or not, I insert the tooth pick in and it come out clean but I didn't tap the top to check.

I knew why, initially I afraid the cake might turn brown quickly so I placed the rack at the lowest rack instead at the medium rack. Anyway it is too late when I realise it because is impossible to re-bake after the cake has already cool off.

So I used the knife and cut off the uncooked area and slice into small cubes for easy consume. I find this is a good way offering people the dessert, instead of one whole slice, one cubes pop into the mouth just nice and no crumb will be laying around.

Ingredient:
  • 170gm Unsalted butter (room temperature)
  • 170gm castor sugar
  • ¼ tsp salt
  • 4 eggs
  • 1 tsp vanilla extract
  • 60ml milk
  • 160gm cake flour
  • 1 tsp baking powder
  • 20gm black sesame paste (put lesser if you do not want the strong taste)
Method:
  1. Preheat oven at 160°C with a wire rack in the middle. Line an rectangle or circle cake tin with parchment, butter and flour. Sift flour and baking powder in a bowl. Set aside.
  2. Cream butter, sugar and salt in the bowl with a electric hand mixer till light and fluffy.
  3. Beat all the egg in another bowl. Add in the egg a little at a time into step 2 (divide into 5 to 6 times) and continue using the electric hand mixer and beat. *Make sure is mix well before you add in another portion of egg into the batter.
  4. After all the egg have been added and mix well, pour in the milk and vanilla extract and mix well again.
  5. Add in the the flour and baking powder gradually until just incorporated.
  6. Scoop out ¼ of the batter in a separate bowl. Add in the black sesame paste over it and fold to mix well. Pour batters into tin, alternating between the two mixtures. Start with the yellow batter follow by the black sesame batter and repeat the step. Rap pan on counter several times to eliminate air bubbles. With a long skewer or chopstick, swirl around the batter to create the marble effect.
  7. Bake for 40-55 minutes or until a tester inserted into the middle of the cake comes out clean. Tap the top of the cake, make sure is not wet and will slightly bound back after tapping on it.
  8. Cool on wire rack completely before serving. Cake keeps at room temperature up to 3 days and can be frozen up to 3 month.

Tuesday, December 11, 2012

Black Sesame Chiffon Cake


In the older days, pandan chiffon cake are more habitual and common seen in bakery shop. But these days in order to attract people attention and be out of the ordinary, hawker start to introduce different interesting and special flavour such as strawberry, banana, chocolate, Oreo etc. Patron are so fortune to spoil with different choices nowadays.
 
 
Every morning, I will spread different jam flavour on the bread for breakfast. I will constantly look for new kind of jam or spread in the supermarket if I finish the current one on hand and I saw this black sesame spread on the shelf in NTUC. So I bought one and try, I pretty like it, you can taste the strong sesame aroma.
 

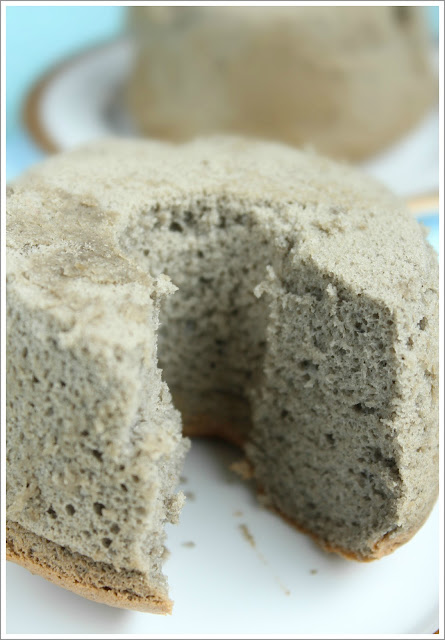
Instead of the usual pandan chiffon cake, I decided to make a sesame chiffon cake since I have the sasame paste (spread) on hands. I went to phoon huat and bought the mini chiffon cake tin to make this on the weekend. I do have a 21cm chiffon cake tin but I wanted to try a mini size. It is more convenient and I do not need to cut into pieces, one mini chiffon cake equal one serving.

 
The result is supreme to me, the cake texture is soft and fluffy, with the hint of sesame taste. The only disappointed thing is the shape, when I took out from the tin, somehow the chiffon didn't come out in a nice shape and some of the corner chip off and left with some holes.
 
Anyway luckily this time my chiffon didn't fall off from the tin because I make sure the egg white is beat into stiff peak (but do not over beat too). How to know whether is in the stiff peak? You turn it over the bowl upside down without the egg white falling off to the ground.
 
My parent said the chiffon cake is not sweet enough but to me is just nice. For the recipe, I get 4 mini chiffon cake.  
 
*Recipe source: Okashi sweet treats made with love. This book can be found in Kinokuniya.


Sunday, December 2, 2012

Kueh Bingka Ambon aka Honeycomb Cake


Ambon is one of my flavour nonya kueh. I ate the first ambon is bought at redhill market, there is a stall selling nonya kueh and this stall sell the best ambon I have even eat. So far I still haven't found a better ambon can fight this stall. I like the chewy texture and the fragrant it bring out once you bite and chew on it. I can't stop having once, at least 3 for me. It come in a small rounded shape. Yum!


I decided to try out myself too, I went research and found this recipe with video guide that is really a good help for me who are inexperience.


It has the chewy texture but still lack of some aroma taste that I want. Although the top is slightly burn but it does not have the burn bitter taste at all. My friend like it, she said quite delicious but I still not satisfy with the taste. Maybe I will modify the recipe if I will to bake again.

*Recipe source:

Ingredients:
  • 85 g sago or tapioca starch
  • ¼ tsp salt
  • ½ tsp instant yeast
  • 145 g eggs
  • 170 ml freshly squeezed coconut milk, undiluted
  • 85 g sugar
  • 20 g young, light green pandan leaves 
Method:
  1. Mix tapioca starch, salt and dry yeast together. Add in the eggs and whisk till smooth. Set aside.
  2. In a small pot, stir the coconut milk and sugar together over medium heat till slightly hotter but not boiling. *pot is too hot to hold but not too hot to touch.
  3. Stir the batter and slowly pour in the coconut milk into batter while continue stirring. *So that egg will not be cooked.
  4. Wash the pandan leaves and cut into small pieces. Pound the pandan leaves finely or blended and strain to yield 1 tsp pandan juice. Discard the pulp and add the juice into batter and mix.
  5. Set the batter at a warm place, covered with a clean towel or wrap with cling-wrap till batter is full of small bubbles about 2½-3 hours.
  6. Gently whisk the starch in the bottom of bowl till just evenly mixed in.
  7. Preheat oven to 160°C with only bottom heat turned on. Line the cake pan with parchment paper.
  8. Pour the batter into cake pan. Bake in the bottom of the oven till batter doesn't jiggle when shake, bake about 35 minutes.
  9. After 35 minutes, increase oven temperature to 180°C. Turn on the oven top heat and move the pan to middle of the oven.
  10. Continue baking till golden brown, another 15 minutes or lesser. *Have a good check, make sure not to over bake the surface.  
  11. Remove the pan from the oven. Unmould by lifting parchment paper. Leave the kueh on a wire rack till cold. Cut into pieces and serve.