Sunday, December 18, 2011

Oreo Cupcakes


Finally i having my school break, it times to spend my weekend time on baking. How i wish i can graduate soon, it really tough quite working full time and studying part time. I will not ever try this again in my life.  

Anyway yesterday finally get to meet up with YL, so i plan to make some Oreo cupcake for her. It's been month since we meet up again.


We when to Itacro Sushi have our lunch, this is my first time visit the restaurant. I would highly recommend this restaurant, the sushi is Oishii and the price is reasonable. I would definitely be back again for more.


I bought two roll of the Oreo cookies, one roll is combine with the batter and the other i blend into fine powder for the decoration. By the way Christmas is getting nearer, hope you enjoy your Christmas season too.. Ho Ho Ho..

Ingredients:
  • Oreo Cookies (1 Roll) *More or less Oreo up to individual.
  • 175g unsalted butter (softened)
  • 150g caster sugar
  • 3 eggs
  • 175g self-raising flour (sifted)
  • 1/2 tsp baking power
  • 3 tbsp milk
  • 1/2 tsp vanilla extract
Icing:
  • 75gm unsalted butter (softened)
  • 150gm icing sugar (sifted)
  • 2 tsp vanilla extract
  • Oreo Cookies (1 Roll) (Blend into fine powder for the decoration)
Method:
  1. Preheat the oven to 180°C fan oven. Line a muffin tin with paper muffin cases
  2. Roughly chop the oreo cookies
  3. Using a hand-held electric whisk, whisk the butter and caster sugar in a bowl until pale and creamy
  4. Gradually whisk in the eggs until just combines
  5. Using a spatula fold in the flour, baking power, milk vanilla extract and chopped oreo cookies until combined
  6. Use a ice cream scoop and divide the batter into the paper cases
  7. Bake for 15 - 20 minutes until golden and risen or insert the toothpick come out clean
  8. Leave to cool in the tin for 5 minutes, then transfer to a wire rack to cool completely
  9. For the decoration, put the butter into a bowl and whisk until fluffy
  10. Gradually add the icing sugar and vanilla extract and whisk until light and fluffy
  11. Using a small palette knife, spread the buttercream over the top of each cake
  12. Sift the oreo cookies power on the top of each cake
Sunday, December 4, 2011

Sesame Cookies


Do you enjoy sesame paste (芝麻糊) ?
Honestly i don't in the past but now i enjoy my sesame paste very much.

Have ever heard from your older generation said that black sesame helps to restore, grow thick and darken your black hair. This is truth from what i research from it, as black sesame contain the nourishes which are required for black hair (Asian people like me).

Recently I bought a book, name "Okashi" during the Popular bookfair. I love this book very much as it suit my ideal of baking recipe. Since the packet of black sesame seed have been sitting in my kitchen for month and i think i should do something to it. Flipping through my baking book and tadah, i found this sesame cookies from Okashi book.


The recipe call for white and black sesame but i only have black sesame so i omit the white sesame. If you want to have a black, shiny, healthy black hair remember to consume black sesame.

*I was wondering if consume white sesame will it produce more white hair? >.<

Black Sesame Ingredient:
  • Pastry flour or Top flour 220g
  • White sesame seeds 50g
  • Black sesame seeds 50g
  • Unsalted butter 100g (Softened)
  • Icing (confectioner's) sugar 100g
  • Salt 1/8tsp
  • Egg yolks 40g (About 2 eggs)

Method:
  1. Sift flour. Without preheating oven, bake white and black sesame seeds at 150°C for 10-15minutes, Set aside to cool.
  2. Beat butter, icing sugar and salt until soft and creamy. Add egg yolk and mix well.
  3. Add flour and sesame seeds and fold in with a spatula.
  4. Divide dough in half. Transfer each half to a piece of parchment paper. Wrap dough in cling firm and chill in the refrigerator for at least 3 hour or overnight.
  5. Preheat oven to 160°C.
  6. Shape your desired cookies shape. Place on a baking tray lined with parchment paper.
  7. Bake for about 12 minutes or until golden brown.
  8. Let cool on a wire rack.
  9. Store cookies in an airtight container to keep them crisp.  

Wednesday, November 30, 2011

Butter Cream Swiss Roll


It's been a stressful and busy month for me. On Tuesday, just finish my IOB exam paper but i still have another round of exam on next week is my statistics paper.

After next week, i will have more time for my baking session. What more Christmas is coming! This year there will a celebration at my 二 姐 (Second Sis) house, i can't for that day to arrive. It been so many year since i celebrate Christmas, every year Christmas is just a normal day at home. But this year definitely not and i was wondering what to bake for this coming special day. ^^


Yesterday i managed to squeezed some of my time, so i decided to bake a swiss roll cake. Luckily this time i success, the previous experience is totally distorted and i threw away.

I bought a book is all about making swiss roll cake, is a pretty awesome book. It come with 2 VCD inside the book, the VCD show the step by step procedure on making the swiss roll. This is a very good book for the beginner like me. The only thing is that this Chinese book the word they used is 繁體中文 (Traditional Chinese) which is slightly different from 简体中文 (Simplified Chinese) and i take up a long time to search word by word to find out the pronunciation.


I didn't did a good roll on the cake as you can see from the picture. I believe this require a few practice on rolling the cake. Practice make perfect ^0^

Chiffon Cake Ingredient:
  • 4 egg yolk
  • 20gm caster sugar
  • 40ml oil
  • 40ml milk
  • 80gm cake flour
  • 4 egg white
  • 80gm caster sugar
Butter Creme:
  • 80gm unsalted butter (room temperature)
  • 20gm icing sugar
  • 50ml whipping cream
Method -
Chiffon Cake:
(Mixing Egg Yolk)
  1. Preheat the oven to 180°C (160°C with fan)
  2. In a clean bowl, place the egg yolk and sugar together and beat with a hand mixer until the sugar dissolve
  3. First slowly add in the oil while continue beating the batter
  4. Secondly slowly add in the milk while continue beating the batter
  5. Pour the cake flour into the batter and beat in the same direction (clockwise or anti), beat gently until the flour is incorporate. (After done, place one side)
(Beating Egg white)
  1. Place the egg white in a clean and dry bowl, use a electric hand mixer and beat the egg white until big bubble appear
  2. Continue beat the egg white until the portion become more, divide the sugar 3 to 4 times add in at a time
  3. Change the speed to high, beat the egg white until stiff peak form.
  4. Place 1/3 of the egg white into the egg yolk batter and mix gently till combine
  5. Pour the remaining egg white into the batter and mix until combine
  6. Pour the batter into the prepared pan
  7. Bake in the oven for 12 minute or until when insert the toothpick come out clean
Butter Creme:
  1. Combine the butter and icing sugar in a mixing bowl and blends both well with a spatula
  2. Use a electric hand mixer, beat the icing sugar and butter become soft and fluffy
  3. While beating the icing sugar and butter, slowly add in the whipping cream and continue to beat until everything combine
Roll the Cake:
  1. While the cake has cool, spread the butter creme all over the cake and roll into a log.
  2. Keep inside the fridge for 30 to 60 minute to let it set into a swiss roll.  

Sunday, November 13, 2011

Kueh Puteri Sarlat

Actually i plan to make this Glutinous Rice Sarlat on last Monday as I need the pandan leave but i forgot that market are off on every monday. Too bad, so i change to yesterday and make my first kueh. 


The weather keep raining on and off during this season. Yesterday the rain is horrible heavy and weather is very dark, the photo i took is really bad even though after edited. How i wish i own an DSLR camera. *So greedy =p

The day before i told my mum that i want to make this kueh on the next day morning and she ask me about the ingredient. On the book, the recipe they use for the top layer (kaya layer) is rice flour and my mum said no, don't use rice flour because the top layer will be very hard. So alright i ask her what about tapioca flour and she said yes, tapioca flour is better and the top layer will not be so hard.

I glad that i listen to her, choosing tapioca flour instead of rice flour. (Listen to mama is right)
The top layer is soft and this is the texture we wanted to make. And for the rice is not soft enough to me, even though i have already soaked the rice overnight. 


My mum mahjong kaki friend said the kueh is marvelous (I so happy when people enjoy the food i make but also quite bashful >.<  when they praise me.. hehehe..) and they ate alot. Weeee.. and this time my mum said the kueh is yummy too! Anyway she also got help me out with the kueh making.

Guess what I nearly burn the kitchen as i forgotten to add water to the pot when the kueh is still steaming and my mum smell something chao ta and i got a scolding from her. Thanks to my mum if not the kueh will become chao ta kueh. Hahaha..

Recipe from With love from the Little Nyonya Book
*I half the portion
Bottom Layer:
  • 250gm Glutinous rice (soaked for 2 hours)
  • 75ml coconut milk
  • 200ml water
  • 1/4 tsp salt
Top Layer:
  • 3 Eggs
  • 250ml coconut milk
  • 100gm sugar
  • 25ml pandan juice (About 10 to 15 pandan leave)
  • 25gm rice flour or tapioca flour
  • 1 tsp corn flour
  • 1/4 tsp salt
Method:
  1. Bottom layer: Drain glutinous rice, add coconut milk, water, salt and stir. Place it in a cake tin with a bed of pandan leaves. 
  2. Steam it for 45 minutes till cooked. Allow to cool slightly, then press the warm glutinous rice using a banana leaf to make it compacts. (I omit this step)
How to extract the pandan juice from the leave? I found a blogger who explain in step and easy to read.
http://wendyinkk.blogspot.com/2009/10/how-to-get-concentrated-pandan-juice.html
  1. Top layer: In a mixing bowl, beat the eggs and sugar till dissolved. 
  2. Add the coconut milk, pandan juice and continue to whisk, gradually add the rice flour and corn flour bit by bit till completely well mixed. Add salt.
  3. Pour the mixture by sifting on the warm steamed cooked glutinous rice.
  4. Steam it for 25 to 30 minutes till set.
  5. Leave to cool completely before cutting into pieces.

Sunday, November 6, 2011

Butter Cake


I would prefer eating mable cake than butter cake, but somehow i bake an butter cake. If you would ask me, which brand of marble cake you like and i will definitely vote for bengawan solo marble cake!

I so naive, thought that i might be able to bake a cake similar to the same as bengawan solo but fail. Hahaha.. I obtain the recipe from a food blogger but i decide not to name out because i might spoil his/her name as my cake turn out pretty bad.


The instruction given to bake at 190 degrees celsius for 40 minutes. The moment after 20 minute, my cake start to turn dark on the surface and i knew the degree must be too high but stupid me, still continue to bake at 190 degrees for 40 minute. When i insert a toothpick in and the toothpick out is watery. Oh gosh, the cake inside is uncook so i turn down the degree to 150 and bake for another 10 minute.


And finally is cook after the 10 minute, however after tasting realise the cake is too wet and the top is burn. Overall is still eatable. Comment are the same from my aunt, mum and ah ma that the cake is too wet.. I'm so sorry about that but i appreciate at least they try and eat down rather than throw it out.. Hahaha!! My 2nd brother-in-law feed the little cutie and they like it, they said is yummy. >.<

The recipe where i took from the blogger, he/she bake the cake wonderful beautiful, is like how i saw in bangawan solo version. But somehow in my hand and i bake until chao ta. I will to bake again until i success in baking one! ^.^   


Wednesday, October 26, 2011

Tanglin Halt Confectionery Shop

It been about a month since i blog and the reason for being I'm busy with my school work. Also I have not brush up my baking skill and utensil for one month too. Seriously I need to bake something on this coming weekend.
Alright I would like to share another old school confectionery shop where I spotted when I use to work at Commonwealth. The shop space is quite small but is cosy. If you see the picture, the tile is still preserve under 60 century kind.


Actually I didn't notice this confectionery shop whenever I walk past until.


One day my colleague offer me this custard puff and I realise that this shop is not ordinary at all. I will always put inside the fridge and let the custard turn cold before I consume. I shall try other pastry if I happen to pop by the place again.
 
Tanglin Halt Road, Blk 46-3

Saturday, September 17, 2011

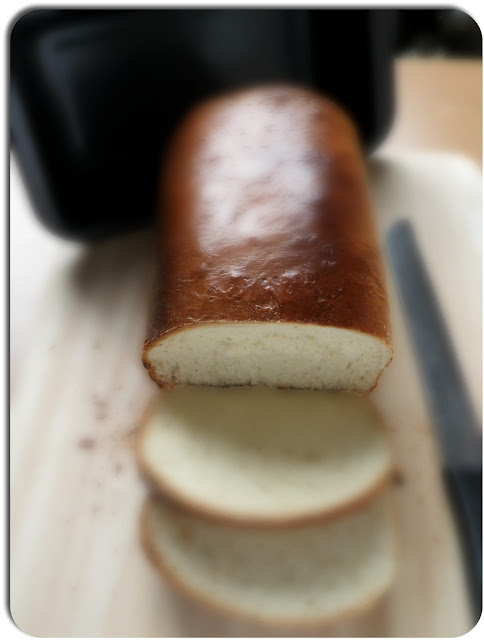
White Loaf Bread

Which brand of loaf bread is your favour choice? In Singapore, people are really fortunate as we have so many different choice of brand and flavour to go for. For me i prefer Breadtalk white loaf bread, the taste is not just plain and the bread texture is unique. However i made one loaf bread myself with a little help from my mum.

Kneading part need your patience and persistence to finish it. Is tiring to knead the dough. It was purpose to knead the dough until elastic and smooth, elastic is where u can stretch the dough until thin layer and it doesn't break easily. Halfway through i stopped kneading after the dough doesn't stick to my finger BUT it not suppose to stop because i just so tired. =p


Blame to my laziness, the bread turnout not soft and fluffy. The outer layer is hard. Next time must knead it longer, how i wish i have a bread machine. It can save my time and energy. Hehehe..


Recipe source from http://www.cookingbread.com/
*I cut the portion into half make one loaf.

Dough Ingredient:
  • 1/2 cup water (warm)
  • 1/2 cup milk
  • 2 tbsp oil
  • 3 cups of bread flour (384gm)
  • 1/4 cup sugar (32gm)
  • 1 egg
  • 1/2 tbsp salt
  • 2 tsp yeast
Egg Wash Ingredient:
  • 1 Egg
  • 3 tbsp milk
Method:
  • In a large bowl combine the lukewarm water, milk and oil mix together.
  • Add 1 cups of flour and mix with a wooden spoon till smooth.
  • Add in the sugar and eggs. Combine to stir together till smooth.
  • Add in the salt and mix together.
  • Add in the yeast and stir.
  • Then allow the mixture to sit uncovered for 15 minute.
  • Continue to add flour a 1/2 cup at a time. Stir till it becomes to hard to mix.
  • Place some flour onto the counter and your hand, knead the dough until smooth and elastic.
  • Place dough into a lightly oiled bowl, turn the dough over to lightly coat all sides of the dough. (This will help the dough from drying out)
  • Cover the bowl with a plastic wrap or kitchen towel and set aside in a warm place for about 1 hour.
  • After the dough has risen, pour out onto a lightly floured surface.
  • Punch the dough to release out the gas from the dough.
  • Shape dough into rectangles length
  • Roll the dough into a log shape, pinch the seam closed with your fingers.
  • Place the dough into the greased loaf pans.
  • Cover with a kitchen towel and allow to rise till double in bulk about 1 hour.
  • After the dough has proofed, make the egg wash and brush the tops of the loafs. Wait for 5 minutes then brush again.
  • Preheat the oven at 180 degree and bake for 30 minute.
  • Remove from pans and cool on a wire rack.

Sunday, September 11, 2011

Sun Moulin


Unlike other bakery shop like Breadtalk and Provence have many franchise. This bakery shop Sun Moulin has one and only in Singapore located at Isetan Scotts Basement 1.

I would like to share this Sun Moulin. I have never enter into the Isetan Scotts building whenever i go to orchard but until one day my ex-colleague told me that she will always visit and make her first stop for shopping at orchard is Isetan Scotts. By her entice word, make me feel like visiting this building one day since i have never visit before. So i did and i glad i did because i found this Sun Moulin where they offer a variety of bread which is atypical from other bakery shop.
This is only the front view of the bread and there are more varieties on de other side
Petit Choco Donut
Mochi Choco

Mochi Cheese
This are the mini assorted bread. 1pcs $0.65, 3pcs $1.80, 5pcs $2.70. Different flavor are allow to mix and choose. Petit Choco Donut coated with chocolate and almond on the top with creamy chocolate filling inside the bread. This is really scrummy. For the Mochi chocolate, cheese, soy and sesame is my flavour among all the bread. When the first bite and after chewing u will find the filling is glutinous, is like eating Muah Chee (mochi) but at the same time u also eating bread. This is the most special bread i have ever eaten in my life. After that i hook onto this bread, is a must buy for me whenever i visit the shop.


I also bought the other 2 bread. The one on the top right corner is a potatoes mix with pork filling bun, the filing contain more potatoes than the meat. Hmm not my liking. The below one is a mixture of bread and cake, the centre filled with custard cream, is soft and sweet. Good try. Some of the bread is quite pricey but is worth it.  

Sun Moulin
Shaw House, 350 Orchard Road
Isetan Scotts, Basement 1
Singapore 238868

Friday, September 9, 2011

Giant Tuna Fish


Check it out this huge tuna fish in Singapore. Yeah is in Singapore, actually this tuna fish is from Japan and the weight is 42.5kg. I happen to saw it on yesterday where i when to Isetan Scotts and they are having Autumn Kyushu Fair. I'm so lucky as the time i went are just right at 2pm is the Bluefin Tuna cutting demonstration. 

The chef is using a saw tool to cut off the tuna fish head.

 
This tuna head cost $50 

Next part is the fish body 


See how fresh the meat is 

Isetan Scotts basement always held Japan fair with yummy Japan cuisine food and it is really a enjoyable trip to there. Paramount the people who serve u are Japanese people with a superb customer service. Honestly the Japan food fair are not cheap but is worth it even the chefs is also Japanese. See how serious they are, not just perfunctory.       

Thursday, September 8, 2011

Plain Roll Bun


As i mention before I'm a yeast lover, so i go on and try home make bun. Making a bread/bun require a lot of time due to the proofing. I spend about 4 hour plus to finish my final bun.


I realise that after mixing all the ingredient together, the next step to do the kneading is the worst and fun part. Worst is because the dough is super sticky, it keep stick to my finger. Fun is because u get to play with the dough and make different kind of shape up to your desire. While i was kneading the dough, my mum came and take a look and after that i let her take over to knead the dough while i prepare other ingredient.


After kneading, proofing and baking finally i get to try my first make bun. The bun is crispy when it is hot out from the oven but after a few hour of cooling the bread turn tough. The book stated that bake it at 180C for 20 minute. For the first batch i follow the book and some how the bun turn overly brown on the surface. So for the second batch i bake it at 180C for 15 minute and this time round the bread is not overly brown.  

Ingredient:
  • 160 gm bread flour
  • 40 gm plain flour
  • 1/2+1/4 tsp yeast
  • 25gm caster sugar
  • 1 tbsp milk power (I omitted as i don't have)
  • 100ml fresh milk
  • 30gm egg
  • 1/2 tsp salt
  • 32gm butter
Method:
  • Mix bread flour and plain flour together, divided the flour into half.
  • Mix all the ingredients together in a bowl except for the butter, salt and the other half of the flour. Mix for about 3 minute or until you will see some small bubble. 
  • Add in the salt and the other half of the flour and mix.
  • Place the dough out onto a floured surface and knead gently until the dough is elastic, smooth and no longer sticks to your hands. (To check whether the dough is elastic, use your finger and stretch the dough into a thin layer where the dough does not tear easily)
  • Transfer the dough back into the bowl and add in the butter, keep pressing the dough with the butter together until butter is totally absorb.
  • Continue knead the dough until the dough is smooth and elastic.
  • Turn the dough back into the bowl and cover with a kitchen towel. Allow the dough to proof into doubled in volume. Place at a warm spot (30C) for 1 hour.
  • After the dough become doubled, use a finger press on the centre of the dough. The dough should be springy and bound back when u press slightly on the side of the dough.
  • Punch down the dough to release out the gas of the dough.
  • Divided the dough into 6 pieces and cover it with the kitchen towel and let it rest for 10 minute.
  • Shape the dough into the shape that you desired, place it on a baking tray with baking parchment and cover it with the kitchen towel until doubled in size.
  • Brush the top with egg wash and bake for about 15~20 minute in a preheated oven at 180C.
  • Remove from the tray and let it cool on a wire rack.

Tuesday, September 6, 2011

Moon Cake 2011

Picture taken from Deviantart
Mid-Autumn Festival is approaching next week. Do you guys celebrate this festival?

Well i guess in Singapore seldom children get the fun of celebrating this festival. I do remember when i was a kid, during mid-autumn festival i use to play the colourful candle and paper lanterns at the playground with my cousin but i do not get to see this anymore during this festival. Children nowadays carry those modern lanterns, come with many different design and with music too. During my young age also have the kind of modern lanterns however i prefer the tradition one.


When we mention about 中秋节, it will link to the mooncakes. During these period of time, u will get to see mooncake every where u go especially shopping mall. There are too many varieties to be spoil, from traditional bake mooncake to snowskin and even jelly mooncake. Every year my sister will buy mooncake for our family without fail. =)


This year she bought the snowskin, different flavour with wine mooncake. I try one, at the top which u can see i cut it into half. The filling is not so sweet just nice and the centre is a white chocolate coated with raspberry puree. Have u eaten your mooncake this year? => 
I wish everyone happy Mid-Autumn Festival, 中秋節快乐。^^

Sunday, September 4, 2011

Sambawang Confectionery


I 'm sourcing for old school confectionery shop as i find their pastry and bread have a kind of old days feel (古早味)。It taste just extremely good to me and more importantly is not expensive. This kind of old school bakery shop has become lesser and fewer as those bakery chef are in their old age, sad to see that. That why i must grab the time to look out if there are any left in Singapore. Do u have any to share? ;)


From the left, u can see those pastry and cake are place. I feel like buying them all but i know i can't. Heehee.. They do sell bread too, u just need to walk into the shop and u will be able to see it.


I bought a sponge cake, custard puff, 2 slice of vanilla cake (from top left). The 2 slice of cake is for my mother. The sponge cake is soft and the taste is just good. I always like to place my custard puff inside the fridge for a few hour before i consume them is because i like it when the custard is cold. For the custard puff is full of custard within the puff, the custard is not so sweet and the puff is spongy and chewy. I will definately come back for more!

Sambawang Confectionery
Blk 6, Beach Road
#01-4869 Singapore 190006
Operating Hours:
Daily from 10.30am to 7pm

Saturday, September 3, 2011

Glutinous Rice


Miss this old traditional Lo Mai Kai so much but instead of Kai (Chicken) i omit other ingredient. I start in hock on to glutinous rice when one days, my mum order a glutinous rice from a store at Ghim Moh market. So i taste a few bite and slowly i finished the whole plate and got hock on it and this is the best glutinous rice i have even eaten.


Since i seldom go down to ghim moh market, so i decided to make some plus i craving for it. Instead of using chicken as the ingredient, i replace it with dry shrimps, chinese sausage and dry mushroom. I didn't steam my glutinous for too long, i want the kind of chewy and abit dry texture. I don't really like the kind of sticky and watery texture. I would said depend on each individual palate. =p


After the whole process of cooking and steaming the glutinous rice, i find the texture just right, only the taste is abit blend.

Ingredient:
  • 1 sticks chinese sausage
  • Dry scrimps - soaked for one hour (depend how many u would like to have in it)
  • 5 dry chinese mushroom - soak until mushroom soften and slice
  • 1/4 tbsp minced garlic
  • 1 tsp sesame oil
  • 1 & 1/2 tbsp of oyster sauce
  • 1/2 tbsp soya sauce
  • 1/2 tbsp dark soya sauce
  • 1 tbsp sugar
  • 250gm glutinous rice
  • 1/2 cup of water for cooking (I use the water from the mushroom and dry scrimps)
Method:
  • The day before, soak the glutinous rice overnight
  • Heat the pan with some oil and the fry the garlic until fragrant. Add in the chinese sausage, dry scrimps, mushroom and continue to fry.
  • Add in the glutinous rice and the seasoning, toss evenly to combine and pour the cup of water until is absorbed into the rice.
  • Scoop the rice and ingredient into a bowl
  • Steam the filled bowl for 20 ~ 30 minutes (depend if u want it to be more sticky or dry)
  • Serve immediately while it still hot.

Tuesday, August 30, 2011

Lemon Madeleines


I was so lucky to found this Madeleines mould at Daiso but sadly i only bought one. I should have buy 2 and I would not find it again at Daiso even i went to different outlet to source for it. One mould can only make 5 madeleines and end up i take up alot of time baking one batch after another.


I use the recipe from Home Bake, Eric Lanlard book where i bought at Popular. And yesterday i bought another 2 more book from MPH because i purchase the voucher at Groupon.  

I would said this is a quick and simple recipe, when the first time i saw this recipe and it remind me of the Nyonya Kueh Bolu. They are slightly different in ingredients. Medeleines taste more rich and dense. As for the Kueh Bolu taste more fluffy and dry. My mom and niece doesn't like the medeleines i make because they said the lemon taste very strong. Opps.. next time i will make other flavour. But hey my elder sister said is delicious.. 


Ingredient:
  • 90gm unsalted butter plus 2 tbsp melted unsalted butter for greasing
  • 90gm plain flour, plus extra for dusting
  • 2 tsp clear honey
  • 40gm icing sugar, plus extra for dusting
  • 1 tsp baking powder
  • 2 eggs
  • 1 large lemon grated zest
Method:
  • Preheat the oven to 180C (fan 160C) / 350F.
  • Prepare a madeleine mould by brushing with the melted butter. Get in there and make sure you reach all the ridges. Dust with flour and invert the pan, tapping out any excess flour.
  • Melt the butter and the honey together in a small saucepan, and leave to cool.
  • Sift the flour, icing sugar and baking powder together into a large bowl.
  • Stir in the cooled butter and honey mixture. Add the eggs and stir in, taking care not to over-mix. Fold in the lemon zest.
  • Pour the batter into a piping bag and pipe each mould two-thirds to three quarters full.
  • Bake the madeleines in the preheated oven for about 10 minutes or until risen and golden.
  • Leave to cool for serveral minutes before turning out on to a wire rack and allowing to become completely cool.

Sunday, August 21, 2011

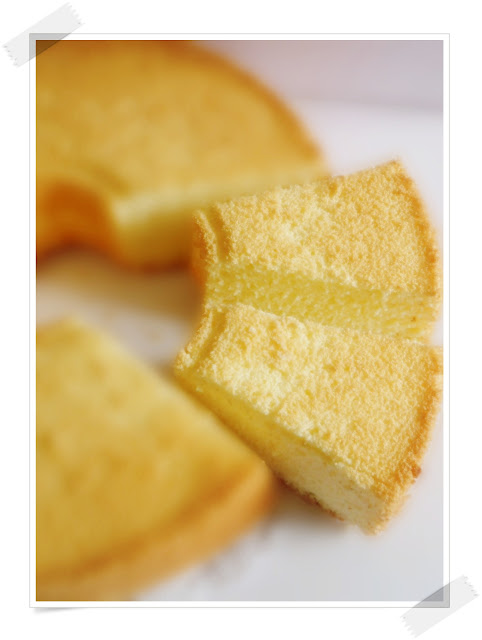
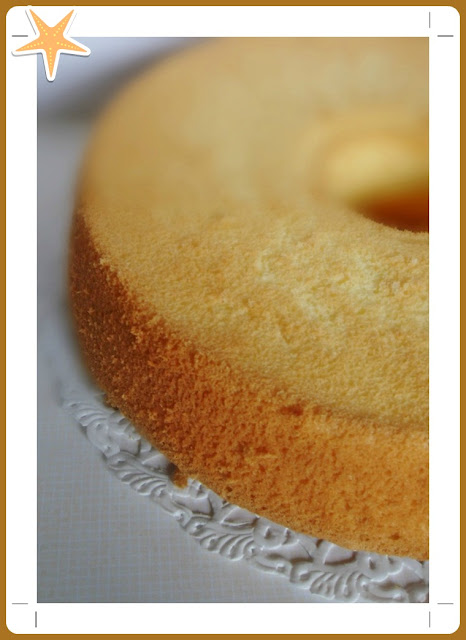
Chiffon Cake


Decided try to make a chiffon cake after i browse through my 妙手烘焙 cook book. I really lucky to have this book on my hand, to me this book is like a encyclopedia (百科全书). It give me a lot of knowledge about baking, it come with DVD guild video of baking and inside the book every recipe has the picture of step by step demonstration. It is an awesome book! And guess what it only cost $13.50

The only bad thing is that this book is a chinese cook book. I have difficulty to read some of the chinese word, i need to check online dictionary word by word and also the meaning of the word. That is the only thing that i dislike.   

In order to make a good chiffon cake, beating the egg white is very important and also the amount of ingredient to use. According to the book guide, egg white should beat until 90% peak and there should be some crack line on the surface of the chiffon when is done after the baking. But my chiffon didn't manage to follow this 2 step from the book.

I try to follow the step of beating egg white and even watch the video again before i start the war but end up i over beat my egg white. I thought to myself 完蛋了. I told my mum that i over beat my egg white and i think my cake will be awful. Second thought to my mind, i do not want to waste the ingredient, just send for baking and let's see the result if really taste awful than i will just feed my bin.

In the book it require to bake for 50 minute however i only use 40 minute as my chiffon surface turn quite brown and i do not want it over bake become black. My chiffon surface doesn't have any crack line which mean that i really over beat my egg white.

Chiffon must let it cool down completely before unmould. I was waiting to unmould the cake after i make sure the chiffon is completely cool down. My mum keep ask me how is the cake taste, so after i unmould and i cut into one slide and test the spring of the cake by pressing down and it spring back. Some hope and finally we taste the cake and the result quite good, it has the aroma smell and is not bad to eat. At least i do not need to feed my bin, it can feed into stomach. Even my super picky food niece ate 2 slice of it. =D 

Ingredient A:
  •  4 Egg White
  •  60 gm caster sugar
  • A few drop of lemon juice or 1/4 tsp cream of tartar or A few drop of vinegar (Either one)
Ingredient B:
  • 4 Egg Yolk
  • 20gm caster sugar
  • 90gm cake flour
  • 60gm Orange Juice
  • 50gm Salad Oil    
Method:
  1. Preheat the oven to 140C
  2. Separate the egg yolk and egg white into different bowl (make sure the egg white bowl do not contain any water of oil on it)
  3. Combine the oil and orange juice, whisk until blended. Add in the egg yolk one by one and the sugar and continue beat (use hand mixer) until sugar dissolve
  4. Sieve 2/3 of the flour and fold with the hand mixer until flour is fully incorporated into the batter 
  5. Sieve in the remaining flour and continue to whisk until flour is fully incorporated without any lump
  6. Beat the egg white with some drop of lemon juice with an electric mixer until mixture become stiff
  7. Fold 1/3 of the egg white foam into the egg yolk using a spatula (using a cutting method to fold the batter)
  8. Add in the remaining egg white into the batter and fold until blended
  9. Pour batter into the mould. Spread the batter evenly with a spatula and bang the mould gently on the table to release the air bubbles trapped inside the batter
  10. Bake for 25 minute and turn up to 170C for another 25 minute 
  11. Remove from the oven and turn it over, let it cool completely before unmould it.

Thursday, August 18, 2011

Chocolate Banana Muffin


I still remember LY told me she would like to have a chocolate banana muffin if i wanna bake something for her. Just nice my mum bring some ripe banana back from my grandma house but i short of chocolate chip so i when to the cold storage and bought it.

I always prefer going to cold storage to browse around the supermarket as they offer more variety of grocery product which i can't find in NTUC, Sheng Shiong or Giant. However i realise that cold storage is abit pricey than other competitor but they also have the product that i wanted. After all is still pretty good to shop in there.


I like how the muffin rise UP as can be seen from the picture. I was so happy when i saw my muffin rise, finally. My previous muffin is flat without rising at all even thought i did add in the baking power.

I added alot of chocolate chip and banana paste, although the muffin is not fluffy but i like the chewy and dense texture. Can hardly taste the banana but can taste the wonderful chocolate.

I gave 3 muffin to LY and de other 3 go into my stomach. Actually i only ate 2 and de half. Another half i gave to my mum to try.


Ingredients:
  • 160gm Plain Flour
  • 1/2 tsp baking powder
  • 1/2 tsp salt
  • 1/4 cup + 2 tbs Oil
  • 80gm caster sugar
  • 1 large egg
  • 60ml milk
  • 1/2 tsp vanilla extract
  • 120gm ripe banana paste
  • 60gm Chocolate chips (extra for topping on the muffin)
 Methods:
  1. In a bowl remove the ripe banana skin and mash the banana into paste
  2. In another bowl sift the flour, baking powder and salt together
  3. Using an electric hand mixer, whisk the egg, gradually adding the sugar while beating. Continue beating while slowly pouring in the oil. Stir in the vanilla
  4. Pour in 1/2 of the flour mixture and all banana paste into step 3, using a spatula to fold all the ingredient together
  5. Pour in another remaining half of the flour mixture and milk, mix together
  6. Pour in the chocolate chips into the batter and mix well. (make sure not to over mix)
  7. Preheat the over to 180C and bake for 20 ~ 23 minute