Saturday, June 29, 2013

Char Siew Bun (叉烧餐包)

 
叉烧包,谁爱吃刚出笼的叉烧包,谁爱吃刚出笼的叉烧包。
好朋友 你到底爱吃那一样 你到底爱吃那一样 那一样?
我最爱吃的就是叉烧包!
Does this lyrics remind you of a song? *Sorry for those who can't understand the chinese word. This is a song name 叉烧包, singer 徐小鳳。I make this bun not because of the song, is just a coincidence that remind me of this song when I typing the blog post at this moment.
 
Do you like char siew bao? For me, I do. I love char siew rice (叉烧饭), char siew bao (叉烧包), char siew su (叉烧酥)。Seem like anything with char siew make me delight. I will always order char siew bao and char siew su when I having my dim sum with my family. Both of this is a must for me.
 
 
Lately I have been practice baking plain bread. So I thought of baking something with filling inside the bread.
 
My inspiration came on one of the weekday during lunch time, me and my colleagues went to a 烧腊 stall at a old coffeeshop enjoying the roast chicken, roast pork belly and char siew. So I decided to try and make char siu bun after enjoying a scrumptious meal.


I making some bun instead of chinese steam bao (包) because I have no confident on making bao since I still a beginner on making bread and I should continue to practice until I good at it before I proceed to bao stage. =p

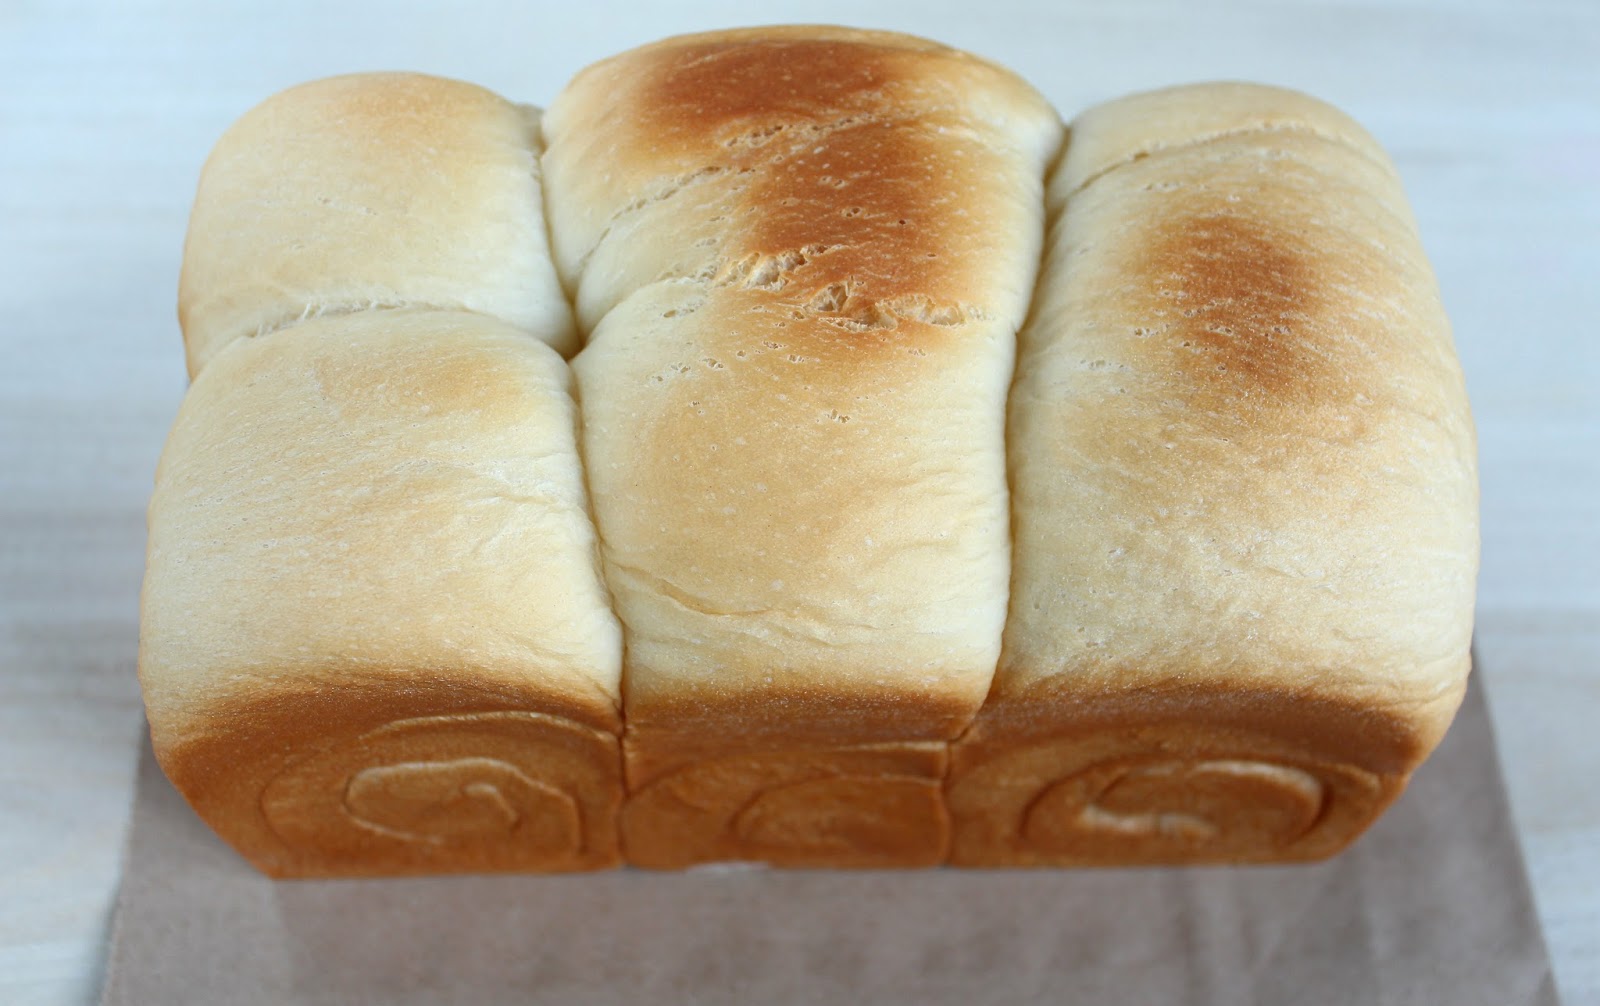
This time for the dough, I'm using straight dough method and I yield a branch of soft and fluffy bread. Yes! I feel so happy because I have never achieve a soft and fluffy bread using straight dough method in my past experience. Not sure the reason behind, is it because of the ingredient that help me or kneading part. Anyway is a success. I'm more and more confident on making bread.

For the filling is a little too watery and gluey, after having the most 2 bun you will feel unctuous. I will reduce the amount of water the next time. I will still post out the filling ingredient for my recording purpose but please don't follow the filling recipes. The bun taste really good but the filling is rather disappointed.
 
*I feel like slapping myself, I can't remember where I got the dough recipe from. I keep searching thorough my bookmark list but I cannot confirm is this the web I got from. Hopefully it is.

Ingredients for the filling:
  • 200gm char siew (叉烧) *I bought from a hawker stall
  • 200ml water
  • 1 tbsp corn flour
  • 1tbsp topioca flour
  • 3 tbsp sugar
  • 1 tbsp oyster sauce
  • 1 tsp sesame oil
  • 1 tbsp soya sauce
  • few drops of red colouring (Optional)
Method for the filling:
  1. Cut the char siew into small bits.
  2. Mix the water, corn and tapioca flour together in a bowl.
  3. Cook the remaining ingredients in a pot under a stove with medium heat. Stir for 1 min until it bubbles. Stir in the (step 2) mixture together and cook for 1 min, keep stirring.
  4. The sauce should be thicken, remove from the heat and add in the diced char siew.

Ingredients for the dough: (I halve the recipe portion)
  • 150ml milk
  • 35gm sugar
  • 58gm melted butter
  • 1 tsp yeast
  • Half a egg
  • 1/2 tsp salt
  • 280gm of plain flour
  • Sesame (Optional for garnish)
 
Method for the dough:
  1. Heat the milk until lukewarm not boiling stage. Pour into a large mixing bowl and mix in the melted butter, sugar and yeast. Leave for 15 minutes.
  2. Stir in the egg and salt to the yeast mixture. Gradually add the flour while mixing until a medium soft dough is obtained. Knead the dough till smooth or using a electric hand mixer to do the job. 
  3. Place in a greased bowl, cover and leave to rise in a warm place until double in bulk or about 1 & 1/2 hours).
  4. After dough become double, divide the dough into 50 gm each. 
  5. Shape it into balls and cover the dough with a cling wrap or damp cloth, leave to rest for 15 min.
  6. Flatten each piece and fill with a tablespoon of filling. Gather the edges and seal well. Place the sealed side face down. Arrange on a baking tray and leave to proof until double in bulk.
  7. Spread some sesame on the top of the dough and bake in a preheated oven at 180° C for 15 to 20 minutes until puffed up and browned.


Sunday, June 23, 2013

Yam Rice / Taro Rice (芋头饭)


After cooking the pumpkin rice, my next task is Yam rice. Actually is not difficult or non too complicated at all. The step is similar with cooking pumpkin rice. As I mention before I love Yam, yam cook with any dishes will make my appetite become double. =p


This time my yam rice is a little bit dry, perhaps yam will absorb liquid. I not sure but I will increase a little bit more water the next time. The taste also a little bit bland compare to my pumpkin rice. Non the less the overall is still tasty.

Serving portion: 1 or 2 persons

Ingredients:
  • Yam - Use half a yam and cut into cubes (I bought one small size)
  • 1/2 cup of uncook rice
  • 3 dried mushrooms (pre-soak in the water for 20 min, do not discut the water. Slice into strips)
  • 15gm dried prawns (pre-soak in the water for 20 min, do not discut the water)
  • 1/2 tbsp oil
  • 1/3 tsp garlic
  • 1/2 and 1/4 cup of water (Obtain the water from the soaking of mushroom and prawns)
  • Spring onions for garnishing (Optional)
Seasonings:
  • 1/2 tbsp light soya sauce
  • 1/2 tbsp oyster sauce
  • 1/2 tsp black soya sauce
  • 1/2 tsp sesame oil
  • Dash of salt and pepper
Method:
  1. Heat up the wok with oil and fried the garlic until fragrant, add in the dried prawns and stir fry under medium low heat. Add in the dried mushrooms and continue to stir fry for a while.
  2. Add in the yam and continue to stir fry than add in the seasonings and stir fry until everything coat with the sauce.
  3. Add in the uncook rice and water (water from the soaking of mushroom and prawns) and stir until all the ingredients are well combine.
  4. Transfer all the ingredients to a rice cooker and cover the lid, let it cook until is ready for servings.

Saturday, June 22, 2013

Bibimbap (비빔밥)

 
I not really a fan of Korean food, more prefer on Japanese food cuisine. But Bibimbap is one of my flavour and I love to order this. Most important is the sauce, the sauce is a little bit spicy but is still acceptable but not all the hawker seller make a good sauce. I try some different stall bibimbap but the sauce cannot make it. Bibimbap is really a healthy and nutrition food, majority of the ingredients is make up of vegetable and is up to your own creative to use different kind vegetables if you want.
 
I know many people crave and love kimchi but is a definitely no no for me. I don't like the taste and smell. Normally when you purchase a set of korean food from the food court, the seller will gave you the side dish like kimchi and ikan bilis but I will always turn down and ask them to keep back. I don't want to waste the food because in the end I won't be touching that side dish. =p
 
 
After I got hook up with the bibimbap, I decided to make my own so I went to those korean mart and look for the bibimbap sauce. The first time I found it selling at Vivo one of the korean mart at S$10+. I got a shock with such a expensive sauce and some more is only 300gm. So I keep hesitant whether to buy or not, in the end I choose not to buy it and look for other korean mart.

Luckily I didn't buy because I found another korean mart selling the exactly same bibimbap sauce at S$7.90, is located at chinatown (upper cross st) near the china square central. The price different is not alot buy at least I save a few bucks. =D

I dish up a non meat bibimbap because I lazy to marinate the meat. So is all vegetables only but it still taste delicious.

Recipe source: http://www.koreanbapsang.com/2010/01/bibimbap-korean-rice-bowl-with.html
*The bibimbap sauce I bought from a Korean Mart or you can make your own DIY sauce too.

Tuesday, June 18, 2013

Pumpkin Rice (金瓜饭)


Suddenly thought of cooking some pumpkin rice when I chance upon a mini pumpkin at the wet market. So sad when I thought of buying the mini pumpkin on a weekend and so "lucky" that they doesn't have it that day. I saw the mini pumpkin is on a friday and the next day I wanted to buy but haizz. So no choice I choose the giant pumpkin, just one slice of the giant pumpkin not the entire.
 
 
The pumpkin rice is really delicious. My kitchen filled with the fragrance from the pot of rice when it was still cooking. The taste is just right and the pumpkin is so soft which don't even need to chew. My mum help herself with one bowl too and I kept the remaining on the next day for breakfast. 
 
 
Serving portion: 2 persons

Ingredients:
  • Pumpkin (I bought one slice not sure the weight, a thin slice. Just nice for 2 persons. Cut into cubes)
  • 1 cup of uncook rice
  • 6 chinese dried mushrooms (pre-soak in the water for 20 min, do not discut the water. Slice into strips)
  • 30gm dried prawns (pre-soak in the water for 20 min, do not discut the water)
  • 1 tbsp oil
  • 1/2 tsp garlic
  • 1 and 1/2 cup of water (Obtain the water from the soaking of mushroom and prawns)
  • Spring onions for garnishing
Seasonings:
  • 1 tbsp light soya sauce
  • 1/2 tbsp oyster sauce
  • 1/2 tsp sesame oil
  • Dash of salt and pepper
Method:
  1. Heat up the wok with oil and fried the garlic until fragrant, add in the dried prawns and stir fry under medium low heat. Add in the dried mushrooms and continue to stir fry for a while.
  2. Add in the pumpkin and continue to stir fry than add in the seasonings and stir fry until everything coat with the sauce.
  3. Add in the uncook rice and water (water from the soaking of mushroom and prawns) and stir until all the ingredients are well combine.
  4. Transfer all the ingredients to a rice cooker and cover the lid, let it cook until is ready for servings.

Monday, June 17, 2013

Red Velvet Cupcakes


I like this cake because of the bright and stunning red with some icing decocation on it. I put some red colouring into the batter to achieve the red sponge. I bought a pack of candy heart shape for the decoation. I saw two different choices, one with bigger heart shape in red colour and the other is shown on the picture above.


Pardon me for the lousy pipping skill, I seldom pipe cream as I don't usually make cupcake. Piping is really fun but it really test on your skill. Either piping or you can use a spatula to apply the frosting on it.


The sponge is moist and it taste great with the cream cheese frosting. If there is remaining that is kept in the fridge, remember to let it defrost at the room temperature for maybe 5 minutes before serving because the cake and frosting turn harden when it is cold.

*Makes 6 cupcakes

Sponge cake ingredients:
  • 30gm unsalted butter
  • 75 caster sugar
  • 1/2 egg
  • 5 cocoa powder
  • 10ml red food colouring
  • 1/4 tsp vanilla extract
  • 60ml buttermilk (I use low fat milk)
  • 75gm plain flour
  • 1/4 tsp salt
  • 1/4 baking soda
  • 1/2 tbsp + 1/4 tsp white wine vinegar (I omitted)
Cream cheese frosting ingredient:
  • 150 icing sugar
  • 25gm unsalted butter
  • 63gm cream cheese (cold)
Method:

Sponge cake
  1. Preheat the oven at 170°C.
  2. Put the butter and sugar in a bowl with a handheld electric whisk and beat on medium speed until light and fluffy.
  3. Turn the mixer up to high speed, slowly add the egg and beat until everything incorporated.
  4. In a separate bowl, mix together the cocoa powder, red food colouring and vanilla extract to make a thick, dark paste.
  5. Add to the butter mixture and mix thoroughly until evenly combined and coloured. Turn the mixer down to slow speed and slowly pour in half the milk. Beat until well mixed, then add half the flour, and beat until everything is well incorporated. Repeat this process until all the milk and flour have been added.
  6. Turn the mixer up to high speed and beat until you have a smooth, even mixture. Turn the mixture down to low speed and add the salt, baking soda and vinegar. Beat until well mixed, then turn up the speed again and beat for a couple more minutes.
  7. Spoon the mixture into the paper cases until two-thirds full and bake in the pre-heated oven for 20-25 minutes, or until the sponge bounces back when touched. A skewer inserted in the centre come out clean.
  8. Leave the cupcakes onto a wire rack to cool completely.
Cream cheese frosting
  1. Beat the icing sugar and butter together with a handheld electric whisk  on medium speed until the mixture comes together and is well mixed.
  2. Add the cream cheese in one go and beat until it is completely incorporated.
  3. Turn the mixer up to medium speed. Continue beating until the frosting is light and fluffy, at least 5 minute. *Do not over beat, as it can quickly become runny.
  4. When the cupcakes are cold, spoon or pipe the cream cheese frosting on top.

Tuesday, June 11, 2013

北海道牛奶土司 (100%中种法)aka Hokkaido Milk Toast (Sponge dough method)


To bake this bread toast, I went to PH and bought a pullman loaf pan. It cost me $30 plus, although quite expensive but I really need one so without hesitation I bought it. The cover does not include together with the tin, they sell separately. And guess what, I went to taobao website and found it selling less than S$5! (excluding shipping and mailing cost).

Even if including the shipping and mailing fee is still cost less than S$30. I feel so heart ache without thinking and check before I bought it.


Haizz alright anyway already bought it. So far I try using the pullman tin and the quality are pretty good. The loaf doesn't stick to the pan after baking and it came out smoothly when I over turn it.

My bread loaf came out with 3 different pattern after the baked, which I have no idea how come it will turn out that. I remember I weight the dough into 3 same ratio and shape it all the same but the end product I got 3 different form. Among the 3 I find it the one at the left look so cute.


Btw I like to go taobao website and buy those baking and utensil stuff. Is really damn cheap but because of the shipping fee so we have to paid slightly more. If without the extra "fees" I think I will lost control and buy almost everything that catch my eyes. Hahaha!!


After I try the different method of making bread, I still prefer using sponge dough method (中种法). This method always yield a super soft like cotton and fluffy texture bread for me without fail. I have try using water-roux method (湯種法) but no luck, the outcome still lose out compare to sponge dough method.

There are a few blogger love using water-roux method and they always got a soft and fluffy bread. I want to prove myself that water-roux method can achieve the kind of soft and fluffy bread because other baker can do it, why not me. I shall try it again this weekend.


For this hokkaido milk toast, the instruction given is using the sponge dough method (中种法). Without fail, I got a loaf of super soft and fluffy bread. See the strip just like a big cotton pad. I cut a small piece for my 2nd Sis to try and after that she ask for more and she said very delicious. My mum friend wanted to try the bread too after she saw I feed my dad a bite and daddy said very nice. Almost everyone like this bread.

I like it too but the milky taste is slightly strong maybe because of the full cream milk ingredient. I shall reduce the full cream milk the next time but if you like milky taste, this recipe you must try it.

Recipe source from this blogger: http://www.wretch.cc/blog/jane7443/7214476#comment98514178
If you would like to see step by step method can refer from this blogger: http://zuzu88.blog.sohu.com/147565229.html

(A) Sponge dough Ingredients:
  • 250gm bread flour
  • 8gm sugar
  • 1.5gm yeast or 1/2 tsp
  • 80gm milk
  • 70gm full cream milk
  • 18gm egg white
  • 5gm butter
(B) Main dough ingredients
  • 20gm egg white
  • 38gm sugar
  • 3gm salt or (1/2 tsp)
  • 15gm milk powder
  • 1gm yeast
  • 5gm butter
Method:

  1. Mix all ingredients (A) together and form into a dough (do not need to knead). Cover with a cling wrap or damp cloth and leave to proof for 90 min or until double in bulk.
  2. After 90 min, cut the ingredients (A) into small pieces and mix with ingredients (B) except the butter together and knead the dough until it is not so sticky. Put the piece of butter into the dough and continue to knead until the dough is smooth, look shiny and can stretch into a thin sheet without breaking into hole.
  3. Cover the dough with a cling wrap or damp cloth and leave to proof for another 50 min or until double in bulk..
  4. After 50 min, divide the dough into 3 equal weight. Shape it into balls and cover the dough with a cling wrap or damp cloth, leave to rest for 15 min.
  5. After 15 min, roll out dough into long rectangle shape and roll it back like swiss roll shape.
  6. Place the individual dough into the pullman tin.
  7. Cover the dough with a cling wrap or damp cloth and leave to proof till 70%.
  8. Brush egg wash on the surface of the dough (I omitted this step). Cover the tin with the cover or not up to your choice.
  9. Preheat oven at 180°C. Bake for 40 mins or till golden brown.

Saturday, June 8, 2013

Potatoes Salad


Craving for potatoes salad so much after I try the one at Genki Sushi twice at two different location. The first time I had Genki sushi is at Orchard Central and the second time is at Chinatown Point which my friend told me.

I love their potatoes salad, they serve the potatoes salad in chilled (really cold). The texture is like eating ice-cream, once you serve the potatoes into your pelate and its literally melt in your mouth.


I wanted to make something similar like Genki ones. I added another ingredient to give the dish with some sweetness which is CORN. I bought the Japanese cucumber and Japanese corn, both ingredients are excellence. The cucumber taste so crunchy and the corn taste naturally sweet.

I gave my Sis and a relative of mine to try and both comment delicious. I have a difficult time to mash the potatoes as I did not cooked slightly longer hence I did not achieve the kind of smoothness but I can taste the bit and pieces of potatoes.

Ingredient:
  • 2 medium potato
  • Japanese cucumber (1/2 of it will be enough, cut into small sizes)
  • 1/4 cup Japanese corn (Any kind of corn can be obtain too)
  • 1/8 cup carrot (Cut into small sizes)
  • 1/4 cup of mayonnaise
  • Salt and pepper to taste
Method:
  1. Wash and peel off the potatoes skin. Cut into wedges (it will be easier to mash it later).
  2. Bring a pot of hot water to boil and place the potatoes inside, cooked until no longer hard and turn soft (use a fork and test).
  3. Cooked the corn and carrots as well in a pot of hot water for a few minutes, do not over cooked the corn and carrots as it will lost the natural sweetness and become soggy.
  4. Using kitchen paper towels and pack dry the carrots and corn, set aside.
  5. Mash the potatoes using a fork or potato masher, place in all the other ingredients (corn, carrot and cucumber) together and pour in the mayonnaise, salt & pepper and mix until everything combine.  
  6. Chilled in the fridge at least one hour before servings. Taste better to serve in cold.

Wednesday, June 5, 2013

SUN with MOON Japanese Dining & Cafe


I went online and search for a restaurant in orchard which I haven't try before. So I found this with good recommendation from the diner comment in blog and some other website all about food. We went on a weekend Saturday to this restaurant for dinner with my bff. I made a reservation a few days before I visit and I glad Sun with Moon allow reservation.
 
 
I like the ambient in that restaurant. The seat they gave us is roomy even though there are only 2 of us (see the pic above). The sofa seat come with pillows. I place the pillow behind my back and when I lead back I feel so cosy and relax. Shiok..
 
 
The service is pretty good, there is a waiter stand in that particular place to serve that area of diner. This is the first time I saw such service, normally in any restaurant the server need to attend to the entire diner in that restaurant. However when the food serve to us is not that incharge waiter, is another waiter serve the food to us. 
 

Different kind of utensil already place on the table so up to your choice of using traditional chopstick with clay spoon or fork and spoon.


Upon the food was serve to us by this nice and friendly waiter ask if we are first time dine in here and yes we are. So he told us how it goes, this mini glass hour placed on top of the bowl with the lid cover on, just wait for the sand to flow down until the top bulb is empty (about 1 minute) and the food is ready for consume. Isn't interesting? Hee hee perhaps to me.

Saba Salmon KM + Soup $22.80 & Salmon Tori KM + Soup S$19.80
The centre of the jar is actually filled with the soup but the soup is rather too little. It will be good if the soup can be refill. There are two ways of enjoying this food. First mix up all the ingredient with the rice and than you can either eat it just it is (dry version) or you can pour the soup into the mixed rice (soup version) according to the waiter explanation.

Overall the food is delicious. I like the rice is very fragrant and is not just white rice. I think they added some ingredient and cook together. Definitely will come back again for Japanese cuisine.

SUN with MOON Japanese Dining & Cafe @ Wheelock
501 Orchard Road
#03-15
Singapore 238880

Operating Hours:
Sun - Thu: 12:00 - 23:00
PH: 12:00 - 23:00
Fri - Sat: 12:00 - 23:30
Eve of PH: 12:00 - 23:30