Tuesday, August 30, 2011

Lemon Madeleines


I was so lucky to found this Madeleines mould at Daiso but sadly i only bought one. I should have buy 2 and I would not find it again at Daiso even i went to different outlet to source for it. One mould can only make 5 madeleines and end up i take up alot of time baking one batch after another.


I use the recipe from Home Bake, Eric Lanlard book where i bought at Popular. And yesterday i bought another 2 more book from MPH because i purchase the voucher at Groupon.  

I would said this is a quick and simple recipe, when the first time i saw this recipe and it remind me of the Nyonya Kueh Bolu. They are slightly different in ingredients. Medeleines taste more rich and dense. As for the Kueh Bolu taste more fluffy and dry. My mom and niece doesn't like the medeleines i make because they said the lemon taste very strong. Opps.. next time i will make other flavour. But hey my elder sister said is delicious.. 


Ingredient:
  • 90gm unsalted butter plus 2 tbsp melted unsalted butter for greasing
  • 90gm plain flour, plus extra for dusting
  • 2 tsp clear honey
  • 40gm icing sugar, plus extra for dusting
  • 1 tsp baking powder
  • 2 eggs
  • 1 large lemon grated zest
Method:
  • Preheat the oven to 180C (fan 160C) / 350F.
  • Prepare a madeleine mould by brushing with the melted butter. Get in there and make sure you reach all the ridges. Dust with flour and invert the pan, tapping out any excess flour.
  • Melt the butter and the honey together in a small saucepan, and leave to cool.
  • Sift the flour, icing sugar and baking powder together into a large bowl.
  • Stir in the cooled butter and honey mixture. Add the eggs and stir in, taking care not to over-mix. Fold in the lemon zest.
  • Pour the batter into a piping bag and pipe each mould two-thirds to three quarters full.
  • Bake the madeleines in the preheated oven for about 10 minutes or until risen and golden.
  • Leave to cool for serveral minutes before turning out on to a wire rack and allowing to become completely cool.
Sunday, August 21, 2011

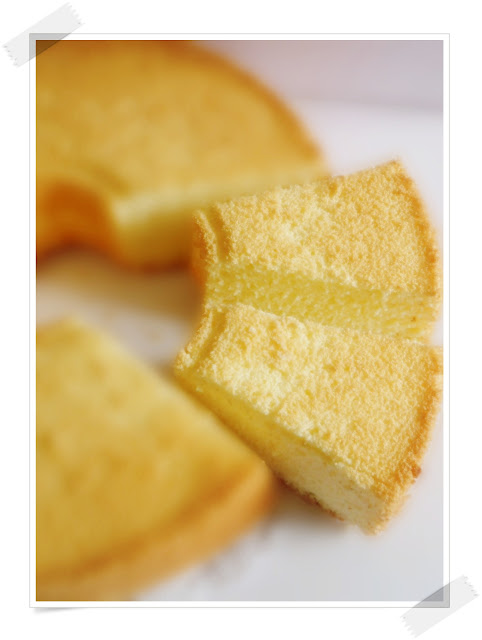
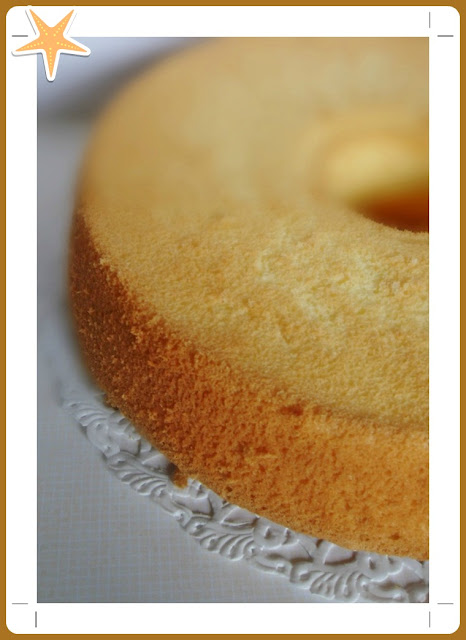
Chiffon Cake


Decided try to make a chiffon cake after i browse through my 妙手烘焙 cook book. I really lucky to have this book on my hand, to me this book is like a encyclopedia (百科全书). It give me a lot of knowledge about baking, it come with DVD guild video of baking and inside the book every recipe has the picture of step by step demonstration. It is an awesome book! And guess what it only cost $13.50

The only bad thing is that this book is a chinese cook book. I have difficulty to read some of the chinese word, i need to check online dictionary word by word and also the meaning of the word. That is the only thing that i dislike.   

In order to make a good chiffon cake, beating the egg white is very important and also the amount of ingredient to use. According to the book guide, egg white should beat until 90% peak and there should be some crack line on the surface of the chiffon when is done after the baking. But my chiffon didn't manage to follow this 2 step from the book.

I try to follow the step of beating egg white and even watch the video again before i start the war but end up i over beat my egg white. I thought to myself 完蛋了. I told my mum that i over beat my egg white and i think my cake will be awful. Second thought to my mind, i do not want to waste the ingredient, just send for baking and let's see the result if really taste awful than i will just feed my bin.

In the book it require to bake for 50 minute however i only use 40 minute as my chiffon surface turn quite brown and i do not want it over bake become black. My chiffon surface doesn't have any crack line which mean that i really over beat my egg white.

Chiffon must let it cool down completely before unmould. I was waiting to unmould the cake after i make sure the chiffon is completely cool down. My mum keep ask me how is the cake taste, so after i unmould and i cut into one slide and test the spring of the cake by pressing down and it spring back. Some hope and finally we taste the cake and the result quite good, it has the aroma smell and is not bad to eat. At least i do not need to feed my bin, it can feed into stomach. Even my super picky food niece ate 2 slice of it. =D 

Ingredient A:
  •  4 Egg White
  •  60 gm caster sugar
  • A few drop of lemon juice or 1/4 tsp cream of tartar or A few drop of vinegar (Either one)
Ingredient B:
  • 4 Egg Yolk
  • 20gm caster sugar
  • 90gm cake flour
  • 60gm Orange Juice
  • 50gm Salad Oil    
Method:
  1. Preheat the oven to 140C
  2. Separate the egg yolk and egg white into different bowl (make sure the egg white bowl do not contain any water of oil on it)
  3. Combine the oil and orange juice, whisk until blended. Add in the egg yolk one by one and the sugar and continue beat (use hand mixer) until sugar dissolve
  4. Sieve 2/3 of the flour and fold with the hand mixer until flour is fully incorporated into the batter 
  5. Sieve in the remaining flour and continue to whisk until flour is fully incorporated without any lump
  6. Beat the egg white with some drop of lemon juice with an electric mixer until mixture become stiff
  7. Fold 1/3 of the egg white foam into the egg yolk using a spatula (using a cutting method to fold the batter)
  8. Add in the remaining egg white into the batter and fold until blended
  9. Pour batter into the mould. Spread the batter evenly with a spatula and bang the mould gently on the table to release the air bubbles trapped inside the batter
  10. Bake for 25 minute and turn up to 170C for another 25 minute 
  11. Remove from the oven and turn it over, let it cool completely before unmould it.

Thursday, August 18, 2011

Chocolate Banana Muffin


I still remember LY told me she would like to have a chocolate banana muffin if i wanna bake something for her. Just nice my mum bring some ripe banana back from my grandma house but i short of chocolate chip so i when to the cold storage and bought it.

I always prefer going to cold storage to browse around the supermarket as they offer more variety of grocery product which i can't find in NTUC, Sheng Shiong or Giant. However i realise that cold storage is abit pricey than other competitor but they also have the product that i wanted. After all is still pretty good to shop in there.


I like how the muffin rise UP as can be seen from the picture. I was so happy when i saw my muffin rise, finally. My previous muffin is flat without rising at all even thought i did add in the baking power.

I added alot of chocolate chip and banana paste, although the muffin is not fluffy but i like the chewy and dense texture. Can hardly taste the banana but can taste the wonderful chocolate.

I gave 3 muffin to LY and de other 3 go into my stomach. Actually i only ate 2 and de half. Another half i gave to my mum to try.


Ingredients:
  • 160gm Plain Flour
  • 1/2 tsp baking powder
  • 1/2 tsp salt
  • 1/4 cup + 2 tbs Oil
  • 80gm caster sugar
  • 1 large egg
  • 60ml milk
  • 1/2 tsp vanilla extract
  • 120gm ripe banana paste
  • 60gm Chocolate chips (extra for topping on the muffin)
 Methods:
  1. In a bowl remove the ripe banana skin and mash the banana into paste
  2. In another bowl sift the flour, baking powder and salt together
  3. Using an electric hand mixer, whisk the egg, gradually adding the sugar while beating. Continue beating while slowly pouring in the oil. Stir in the vanilla
  4. Pour in 1/2 of the flour mixture and all banana paste into step 3, using a spatula to fold all the ingredient together
  5. Pour in another remaining half of the flour mixture and milk, mix together
  6. Pour in the chocolate chips into the batter and mix well. (make sure not to over mix)
  7. Preheat the over to 180C and bake for 20 ~ 23 minute

Sunday, August 14, 2011

Chocolate Mint Pillow Shortcake

It's WT Birthday. I didn't get to celebrate her actual birthday on that day because of my exam, so we meet on the next day at Nex Mall.

We have our dinner at Siam Kitchen (Thai Restaurant) as i bought the voucher at Bigdeal which worth $20 at $10 net. Is a steal. =/ After all i would said the food is not really that fantastic.

Wei Ting didn't eat much as she do not have the appetite and already not feeling well the past few day but i glad she is recover today.  


We are friend since primary one till now! It's been 16 years of friendship and i really treasure it very much. Still counting our friendship...

Been her buddy for years and of course i know that her favor food MINT, anything with mint will please her. She's a easy content girl. So i decided to make a chocolate mint shortcake for her birthday gift.

As the chocolate mint is not enough so i decided to use the cookies cutter for the rest of the dough and dip with the chocolate.

She told me she like it very much and even her family also find the cookies is nice. I really happy that they enjoy my home make product. Hehe..

Here is the end product with decoration on the tin cover.
   

Shortcake center fill with Andes Chocolate Mint

Ingredients:
  • 350gm plain flour
  • 227gm unsalted butter
  • 1 large egg
  • 1 tsp vanilla extract
  • 1/4 salt
  • Andes creme de menthe thins
  • semisweet chocolate chip
Methods:
  1. Sift the flour and salt together and set aside
  2. In a large bowl, beat the butter with electronic hand mixer at low speed first and slowly to medium speed until the butter become creamy
  3. Add in the sugar and beat until smooth or until sugar is incorporated
  4. Lightly beat the egg. Add in the vanilla extract and abit of the egg wash, beat at low speed for one minute, pour another bit of egg wash and do the same step. (Divide the egg wash into 3 times)
  5. Add in the flour mixture and beat at low speed and increase to medium speed until all incorporated
  6. Wrap in plastic wrap and chill the dough in the refrigerate until firm.
  7. Wrap the andes chocolate mint with the dough in the centre.
  8. Pre-heat the oven to 175 C. Bake the cookies for 10 to 12 minutes. Cool on wire racks.

Saturday, August 6, 2011

Peanut Cookies


This peanut cookies is especially make for my colleague who is my neighbour PE sitting on my right side with a small window (glass) apart from me. As i was leaving KN (company) so i decided to make some cookies as a farewell gift for her. In the office we really get along very well, we talk alot and share both experience with each other. She is a very quiet, soft spoken and a very sweet girl with no temper. To me she more like a friend than a colleague. I hope i can meet her out again. Her husband is really lucky to have her as wife. ;) Anyway i wish her all the best.

About my cookies, as this is the first time i making an crispy (it is hard to me) cookies. I didn't know that cookies added baking soda will expand. I use a cookies cutter, cut out the shape send into the oven after a few minute when i check back and i discover that my cookies expand and also out of shape. After that i realise that is no point using cookies cutter so i make it into small dough ball and placing each dough a distance away if not after the baking, cookies will stick to each other. I don't really like crispy or hard cookies, it make my gum pain.

             Recipe from 500 cookies book

Ingredient:
- 200g plain flour
- 1/2 tsp baking soda
- 115g unsalted butter
- 100g caster sugar
- 100g unrefined light brown sugar
- 1 egg
- 225g crunchy peanut butter
- Pinch of salt (I omit as peanut butter is already salty)

Method:
- Sift the flour and baking soda together
- In a separate bowl, beat the butter and sugars until soft and creamy
- Combine the egg, flour mixture & peanut butter
- Add the butter and sugar mixture and mix until smooth
- Pre-heat the oven to 160C
- Shape the dough into 3cm balls and place them 5cm apart on baking sheet. Bake for 15 min or until golden
- Remove from the oven and allow to cool on the wire rack. Cookies can store for up to 5 days.